Friday, September 28, 2018

Stamperia Dress Form!

Hiya! Happy Happy Friday! Today I have  pretty big canvas to show you! 10x20 (25cm x 50cm)


Starting off I took Finnabair Rust Effect Paste and layered it through a stencil until I got the color Combo to look rusted.


Next I took My Rice paper from Stamperia and fussy cut the dress form,I kept the trimmimgs from the paper. I traced the dress onto chipboard and cut that to size also, giving the dress some sturdiness. 


Here You see I add the trimmings of left over rice paper with soft gel medium and trace the outline of the dress to canvas so I know my focal point!


I added stencil with Brown Archival ink and some stamping with black archival, This helps blend the rice paper into the background. Also Crackle paste from (Cosmic Shimmer)


I added a few spritzes of Lindy's gang sprays in (Merci Beaucoup Mint) I add extra cardboard to the back of the dress so it sits higher up on the canvas, I'm playing around with the postion of all my bobs and bits.


After figuring out my composition I give everything a layer of Black gesso and  glue down with heavy gel medium


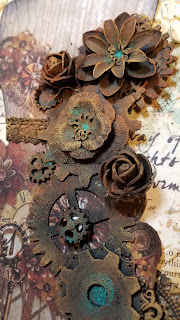
I take rust paste and also the turquoise paste from the Norther Lights Texture fantasy set and add it to all my embellishments. Ill link below embellishments used also


Next I add all my finishing touches Prills in (Aqua Net) Tim Holtz (story sticks) Finnabair Vintage Melange art pebbles, and Finnabair waxes in (Vintage Gold) and (Bronze Age). Thats It! hope you like it! XOXO




Friday, September 21, 2018

Steampunk lady

Hello! 
Its friday, and time for a new blog post. I hope u all have a good start on the weekend. 


I have made this steampunk lady and want to show you how I build up the details. 


I used a lot of details from my stash. But, first I colored the body with PentArta metal colors. 


I glued some different details on top of each other and I wanted it to look symmetrical. 

After I was done with all details I colored everything in the same color as the whole body. 

When the metal colors dried, I used s heat gun, I started to add some more colors. I used Finnabair Rust paste.


I added the paste here and there, and used the brown rust paste with some water to make the “deep feeling” around the things, a bit more 3D. 


I ended with the gold color from Finnabair Patina set. I took just a little, not thick, on my fingertip and went over very very easy and not much. I did this until I felt I was satisfied. I also used some drops here and there from PentArts yellow rust effect in small bottle. 


Take care! 
Love, Milo 

Friday, September 14, 2018

Lost!

Hi Happy Friday everyone! Today I decided To create something dark and creepy! 

I started with putting together the Tando Creative -The art room base kit. I left the outer edge off for now. I then used some soft gel and adhered the New Tim Holtz Collage paper -Halloween
I just LOVE that lace!


Next I took some sprays I used Lindy's Gang Spray in - urban amethyst and Little Birdie color splash spray in Paprika I used some random stamps and did some more background stamping!


Nest I sed resin and cast this heart, Painted in red with acrylic paint and put Distress Crackle paint -Clear Rock Candy.


after that dried I added black Lindy's Gang spray in -Blazing black and lightly dabbed it off.


Now using the Little Birdy Brick stencil I added Cosmic Shimmer Crackle Paste  in Ivory to give some texture to the walls.


I also added My homemade coffee Ground Spray to the backround for a more vintage look. I started assembling the inside I used some black thread paper flower leaves that I also sprayed with blazing black Lindy's sprays. and a quote chip from Tim Holtz -Halloween (Lost in the Darkness)


Now to the bricks again, I sprayed them with blazing black spray and and dabbed them with different shades of gray and black acrylic paint.


Finishing it off with some Art stones , Vintage art pebbles, Glass Glitter and Glitterbitz!
 Links for products down below
XOXO - Nicole Palos


Friday, September 7, 2018

Googles

Hello dear crafters. 
I’ve built a par of googles, that I have colored and decorated. I actually think I will add some more decorations though. And I promise to show the result later. 


This is all pieces that is included to the googles. The one in the bottom of the picture will be turned as the one that is laying on top of it. 


This is how it will be glued together. 


All pieces together. 


I gave my googles color with PentArts Iron Paste. 


I have used some decorations from Tim Holtz and Prima Marketing. 


You who seen my creations before understand that I need to add more to those googles before I am 100% satisfied. :) 

Hugs Milo