Friday, May 25, 2018

Dream

Happy Friday everyone! 
 Today I made a 12x12 canvas using some great products from My Rusty Crown!

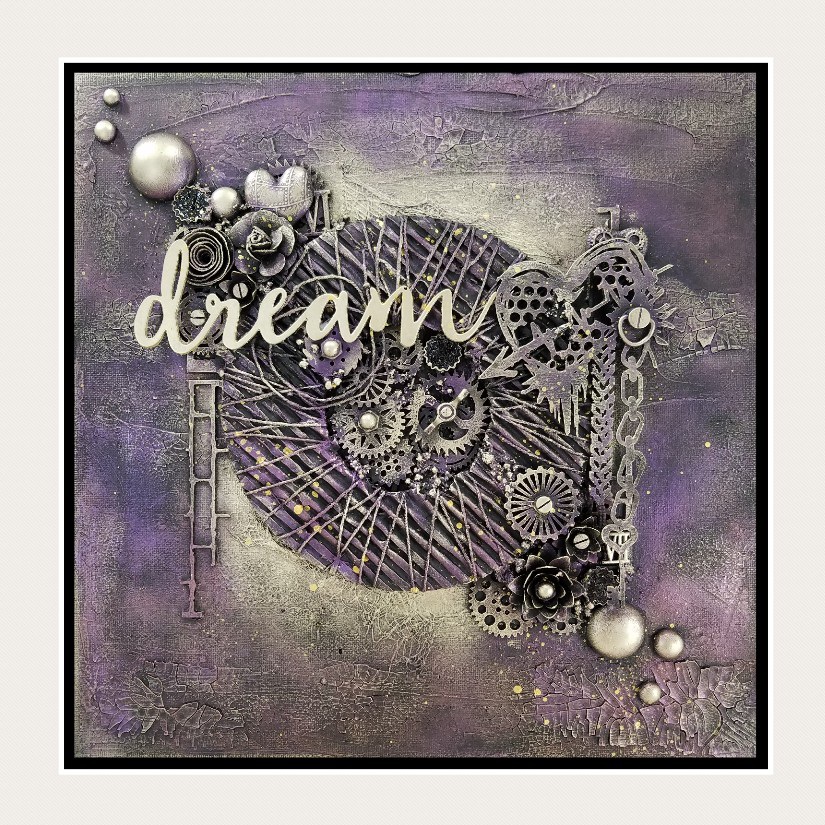
I started with giving the whole thing a layer of finnabairs white crackle paste and letting that dry.next I took the negative space from some chipboard and put that down as my base.
Here I just took some cardboard packaging and wrapped some string around it. I used staples to secure them down.


Now everything gets a good layer of black gesso, if your having trouble getting in all the nooks and cranny's water the gesso down some and use it more as a liquid. 


now to add the second layer of embellishments. I used so many items you can find at my rust crown, I'll make a more detailed list at the bottom. that heart chipboard is to die for though right? So Grungy!


Now on the the second layer of black gesso!


Here I brushed on finnabairs amethyst magic wax as my first layer of color.
I added white gold as accent color. added some gold paint splashes and am calling her done!


Supplies Used
                                                  Finnabair Art Alchemy Metallique Wax
                                            Finnabair Art Alchemy Antique Brilliance Wax
                                                                 Prima Bottle Caps
                                                            Mini Roman Numerals
                                               Creative Embellishments Chipboards
                                                                   Heavy Body Gel
                                                                    Crackle Paste


XOXO -Nicole

Friday, May 18, 2018

DreamCatcher

Hello Crafters!
 I’ve used a lovely stamp set from Aall & Create. When I saw this beautiful bird and feathers, a dream catcher appeared in my head. 


As base I’ve used a piece of cardboard. 

This is the stamp set; I’ve colored and cut all out. 

This beautiful wall papers from Tim Holtz have perfect colors. 

I teared the wall papers to thin stripes and glued them on my cardboard. I added some doileys from my stash and used Crackle paint medium on top of everything. Just here and there. 


I used Tim Holtz Distress Oxide Gathered Twigs with water and dip my cardboard in it. 

I used stencils and made numbers and clocks in different places. 


I added more oxide direct from the ink pad on top of it and sprayed with water. 


I added washi tejp from Tim Holtz to make some colored pattern with text. 


I added my ring and chipboard from my stash and stenciled a clock in the middle. I added more of the oxide color on it. 
Some metal charm and more washi tejp. 

On top of all feathers I added some pearls from my stash. 


Hugs Milo <3 


Friday, May 11, 2018

Rusty Etcetera Tag

Hello Happy Happy Friday!
Today I'm showing my process on creating this rusted tag made with a Tim Holtz Etcetera Tag!
These tags are so thick and sturdy they can take anything you throw at them! 


First I started off Covering the whole thing With Tim Holts Design tape. I used a new pack called (merchant)


Next I took Out the Tim Holtz Milk caps and glued them down with a little gel medium.I also gave it a nice coat of clear gesso.


I used many embellishments Tim Holtz Idea-Ology Foundry, Finnabair Roman Numerals, Stamperia resin frame from a Stamperia mould,  I colored the Creative Embellishments Gears with Finnabair wax (Red Amber) and gel medium to attach them., Tim Holtz Mini Stitched Stencil,and used Glass paste through the stencil.   


I added Prills In (Go Man Go) and added touches of Finnabairs Rust Effect Paste. Some white splashes and Bam done!


That's it! pretty simple and quick. Ill list the products in link below! 


Friday, May 4, 2018

Collage papers & stencil

Dear crafters! 
Today I’ll show you how I use Tim Holtz Collage papers together with stencils from TCW, flowers and Acrylic Paint from Prima Marketing. 


So lovely products! 


First did I use decoupage glue to add the collage paper from Tim Holtz to the background. I added glue both under the paper and on top of it. 
I used the stencil from TCW together with thick paste for 3D effect. Before I took the stencil away I added Acrylic Paint from Prima Marketing for opal effect. 


I used a brush with very little amount of the acrylic color and added on top of the paper, outside the “ring” that the stencil made. 


I added washi tejp Humidor, from Tim Holtz inside the square, and to some more places. Embossing powder from Emerald Creek is melted here and there. I added a metal story stick from Tim Holtz in the square. 


I added white crackle paint from DecoArt Media on details, and I colored the edges of the flowers from Prima Marketing with Acrylic Paint. 


I used Finnabairs Mini Art Stones as details and a last touch of Acrylic Paint.