Friday, November 10, 2017

Snow & Joy

Hello!! Jennalee here today. I have a fun step by step tutorial to share with you today. It all started with this vintage photo I found while out junking. The release of Tim Holtz's Christmas line really got me in the spirit to create some Christmas projects early this year. 


I started with a small size Etcetera Tag. These tags measure 5.5"x10" and are made of thick board. They are very sturdy and can handle a variety of mediums. I covered my tag with a piece of paper from Tim Holtz's Christmas Paper Stash. Adhere paper to tag with Distress Collage Medium. 
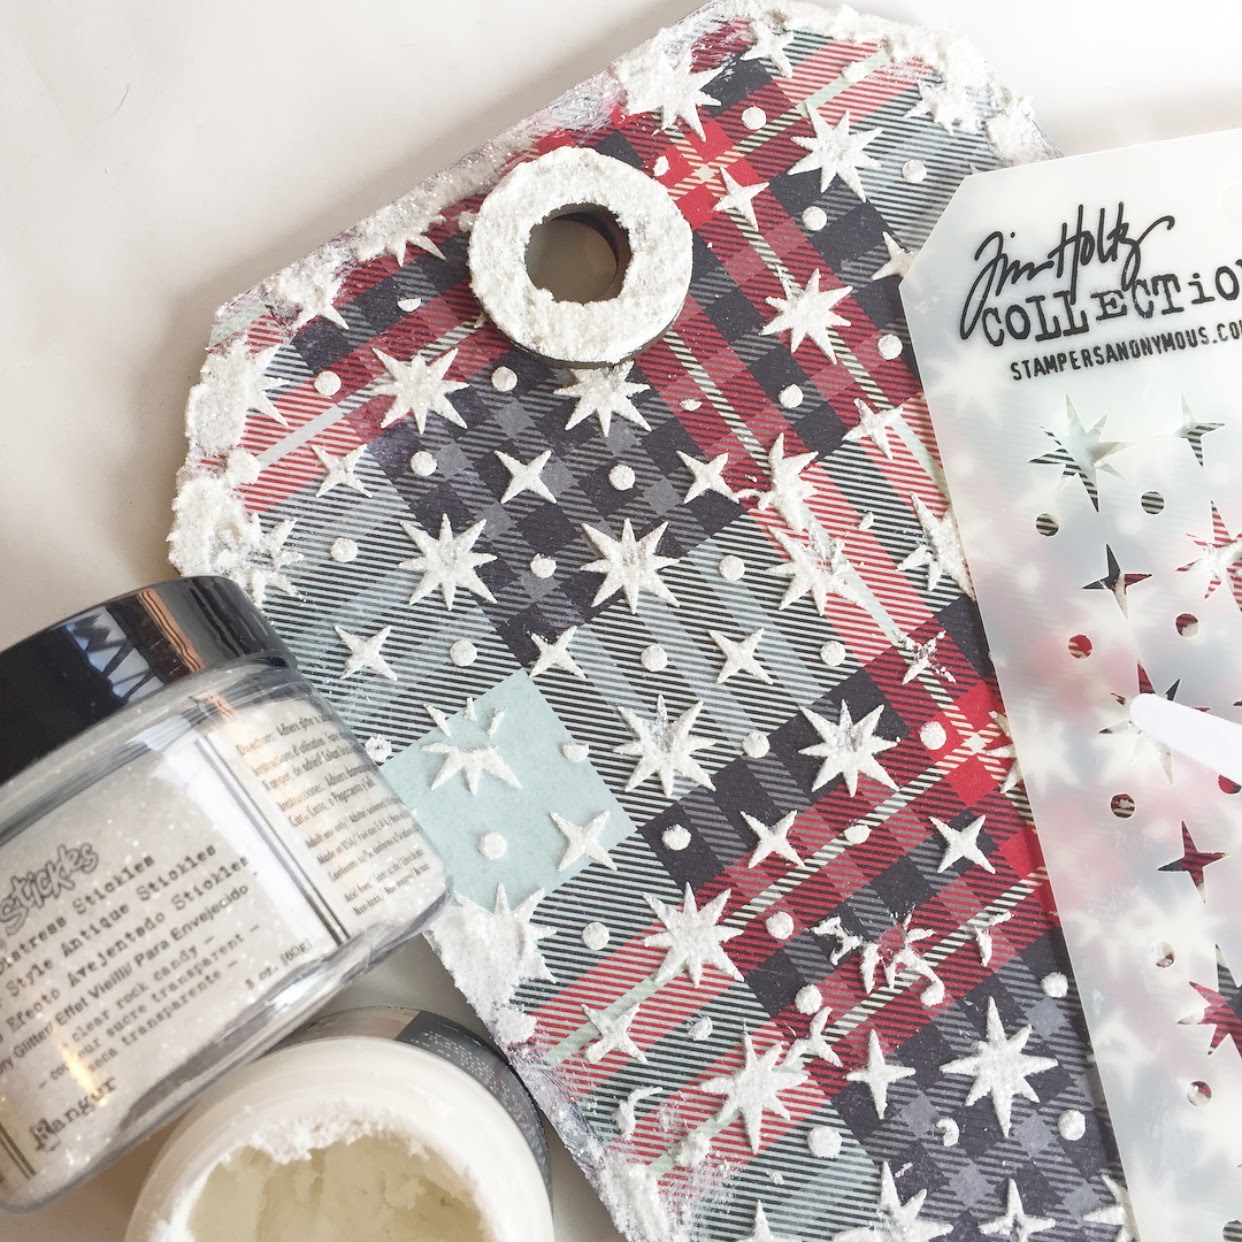


With a palette knife spread Grit Paste thru the Starry Night layering stencil. While the Grit Paste is still wet sprinkle on Rock Candy Glitter. I covered my entire tag with stenciled stars. I thought I had overdone it but once you start layering your ephemera you'll be glad you covered the whole tag.


Using your palette knife add some swipes of Grit Paste around the edge of your tag and to the reinforcer and sprinkle with Rock Candy same as before. Grit Paste needs to be air dried, so set your tag aside. Be sure to clean your stencil and palette knife while the Grit Paste is still wet. 


While your tag is drying begin prepping your picture. I made a photocopy of my original picture onto photo paper. It didn't look quite vintage enough so I added some aging using Antique Linen Distress Ink. Using a glue stick lightly tack down photo to piece of black cardstock. Stitch around edge of photo and trim down cardstock with pinking shears. 


 From the Christmas Ephemera Pack pick the pieces you wish to layer on your piece. The music piece is from the Christmas Bookboard Baseboards pack. To add some visual interest I added a strip of black text from the Paper Stash pad. Adhere all pieces using Distress Collage Medium. 


Cut a pair of Ice Skates from white cardstock. I adhered my cardstock to a thin layer of chipboard for some added definition. Tip: Save the chipboard pieces that come in your Myrustycrown.com orders. It is the perfect thickness for die cutting. You can even use it with some thin lit dies. 


Cover both skates with Distress Crazing Medium. Allow to air dry. Once your skates are dry add a bit of aging with Antique Linen Distress Ink. Color in heel with Distress Crayon. Paint blade of skate with Distress Paint. Using a needle and baker's twine lace skates and wrap laces around the top of skates and tie a bow. 


I am obsessed with Distress Crazing Medium. It is the perfect vintage touch. 


To decorate the skates cut some foliage from the Festive Greens thinlits set. Using Distress Oxides in Peeled Paint and Cracked Pistachio color cardstock. Smoosh ink pad on craft mat and spray with water, dip paper into ink and heat set. For the berries I used Beaded Berries colored with Distress Spray Stain in Picked Raspberries. 


Attach foliage and berries to skate. Adhere skates to bottom right corner of tag using Distress Collage Medium. Pick words from Christmas Words and Phrases Chipboard pack and adhere with Distress Collage Medium. At this point also attach the tag reinforcer. 


I hope you enjoyed this tutorial. I had so much fun making this piece and using Grit Paste and Rock Candy. It is such fun combination!! If you try making this piece for yourself or try any of the techniques I hope you will stop by and share it in the Facebook Group. Happy Creating~ Jennalee 


Friday, November 3, 2017

Design Team Call


My Rusty Crown

Design Team Call ( 6-month term starting in January, with option to extend) We are an online store that specializes in craft and mixed media products

We are currently looking for 1 US based Design Team member.  Any applicants do need to be active on social media sites, including; Blogger, Facebook, Instagram, and Pinterest.
We are looking for someone who loves to make mixed media and rubber stamped projects. Must be enthusiastic and dependable.
What we expect:
-1 blog post a month with a full step out tutorial -mini posts highlighting the store throughout the month on your social media -you must have a personal blog.
-take great photos.
-upload to various Facebook pages.
-able to take directions from Team Lead and Store Owner What you will receive in return:
-A quarterly stipend to use for product in the store and product discount 
-Your name and photo linking to your blog to the My Rusty Crown 

To apply, please send the following:
1. Please email Jess at twomaddahlias@gmail.com with Design Team Call in the subject line. 
2. Please send photos of 3 projects you feel best showcase your abilities. 
3. Please provide a link to your personal blog, instagram, Facebook, Pinterest, YouTube, and any other other pertinent social media.  
4. Please provide a list of past and current teams.
5. Tell us a little bit about yourself and why you think you’d make a great member of the   Rusty Crown Crew.
We will be accepting submissions for the Design Team until November 17th. 

Good luck! We cannot wait to see what you have to show us!

Inspiration from our Facebook group

Are you part of the Inspiration group on Facebook? If not, you are totally missing out. There is so much talent there it is crazy! 
Here are just a few of the projects that have our jaws dropping.  

This burlap page in Delores Miller's Dina Wakley Journal is just stunning. we are loving the Gypsy vibe. 


This altered dress form makes our hearts beat just a bit faster.  Nicole Palos even has a blog post detailing how she created this beauty.  

Karen Keefer Orr made the cutest project with a little lesson from our very own Martina! 

So this is just a little taste of the talent you will find! Come and share your makes too.  We would love to have you.


Friday, October 27, 2017

Halloween ATC


Halloween comes close just around the corner. I LOVE Halloween. I guess it is because of all beautiful cool skulls and creepy things. 

I have made ATC cards with Tim Holtz Halloween stamps and papers/text stickers. I started with spellbinders angular die on top of wellpapp in the bottom. I like the shape of it. 


I added a lot of small pieces with different poison texts, cutted from Tim’s Halloween paper stack. All edges are distressed. 


I found some small metal stuff in my stash, the small rings I always cut away from charms was perfect to add here and there. 


I embossed the stamp pictures  and colored them with Distress Markers. I love the facial expressions at those stamps. 


I choosed to add the faces to the cards with 3D so they stamds out from the card, that makes both the face and the background to be seen better. Its always hard to see on pictures how it look. 


I added text stickers from Tim Holtz text sheets with Halloween theme. After glued everything together I splashed coffe over the cards.


I wish you all a spooky Halloween! 

<3 Milo Lilja 
Milo Lilja 

Friday, October 20, 2017

Potions Book

Hi Everyone,
I was lucky enough to get a couple cuts of Eileen Hull's Journal die and I will admit I stared at them for months.  Yes, months.  I am not a journal girl.  Here's what I came up with instead.

I made it into a witch's potion book, really a cabinet.  Here's how you can make one too.
Cover your journal with paper from the Tim Holtz Wallflower pack.  A single 12x12 sheet will cover the front and back.  A second sheet will cover the inside. Give it a coat of Vintage Distress Medium and then smoosh on Oxides in Peeled Paint, Vintage Photo, Walnut Stain, and Frayed Burlap.  I added one of the mixed media thinlet cuts to the front.  If you have a Xyron sticker maker it makes adhering these little bits much easier.  
Here is my idea for the initial cover layout.  The letters are from an old Scrabble game(I hoard Scrabble tiles).  The ephemera bits are all from a single pack.  The witch was so easy to cut.  I adore using thinlets.  
I did a really messy tie to keep my journal together. I wanted the book to look like it had been around for years.  Cheesecloth dyed with Distress Spray stains gives it a little extra creep.  The witch has a tiny skull tied on her belt too.  The cover was splattered with Distress Paint in Black Soot.  


Pull the lids off of three Altoid tins and give them a rough coat of Black Gesso.  You don't need to do the backs.  I added black paint and used Ten Second Studios Patina Kit to make rust in them. I glued them together using a really strong glue. This has to happen in steps so when each layer was drying I made the various vials to go inside of them.
This is a Tim Decorative Dome.  This is just perfect to me! The skull and crown are just glued in there. 


This one is covered with Distress Rock Candy Crackle.  The spider legs are strings from cheese cloth. 

This is a Frozen Charlotte I made out of resin.  I had to really squash her in there.  The liquid is a Plain Jane from Canvas Corp.  

You can't tell, but there are googly eyes in the Eye of Newt bottle. 
Once the tins are dry you just start playing with how you want to layer them in the tins.  Moss adds the perfect creep factor and covers the gaps between the tins.  The tins are glued into the book using Beacon three in one.  

The other side has another piece from the ephemera pack.   
The edges are all covered with Distress Crayon .  On the edges where the book would be handled I added extra crayon to make it look like it was worn from all of the hands touching it. 
I didn't really decorate the back cover much.  

There you have it! 
Happy Haunting,

Friday, October 13, 2017

Happy Friday the 13th!!

Hello!! Jennalee here today, wishing you a Happy Friday the 13th!! I know many find Friday the 13th a day full of mystery and superstition. For me, I like to think of it as a day of luck. Fun Fact: I was born on a Friday the 13th. My mom has always said that it brings luck for those born on that day. 

I wanted to make something Halloween, but I just haven't been in a Halloween mood this year. So when I was digging thru the Tim Holtz Idea-ology Halloween Ephemera pack I found a few bits with my fave number on it. Inspiration struck!! 


This is quick project with some fun details. 


I started with the Composition Book from the Halloween Bookboard Baseboards. 
I love these Baseboards, they are the perfect base for an assemblage project. 


Here are the pieces I pulled out of the Halloween Ephemera Pack. These Ephemera packs are jam-packed full of vintage goodness!! 


If you know me then you know I sneak in a bit of messy stitching whenever possible. I followed along the lines of the bingo card with a straight stitch and filled in the "free" space with lots of stitches. On the Lotto card, I stitched around the perimeter of the frame and randomly chose 3 spaces to fill in. I left the threads hanging they offer an added texture to the piece. 


I used Distress Collage Medium to adhere everything to the Bookboard. Confession, I'm pretty new to Distress Collage Medium and I LOVE it!! The consistency is just dreamy and it perfectly adheres things even 3D elements like the Vials and rose. 


I filled two vials (one not pictured here) with glitter or "Luck" and tied some black and white baker's twine around the top. 


I love adding a Character Construction doll to my projects whenever possible. This girl from the Paris Flea Collection was the perfect fit. The Stamp Platform is one of my favorite new toys and makes detailed stamping SO much easier. 


I really enjoy stamping onto a piece of vintage book text that has had a couple layers of gesso added. I add 2-3 thin layers of gesso and heat dry. It provides a nice texture and the book text peeking thru adds some unexpected detail. 


After I stamped and colored my doll with watercolors and colored pencil I used the die cut made especially for this doll. The dies for these dolls make cutting them out a breeze. Oh and don't worry that her bodice isn't fully stamped we'll take care of that. 


Using an Embossing Dauber and Salted Wine embossing powder I heat embossed the bodice. Salted Wine is such a gorgeous Fall color and complimented the orange and black. 


To finish off the piece I adhered the Character Construction Doll to the background collage and topped the piece off with an Idea-ology Hanger. 


Thanks for stopping by and spending a few minutes with me today!! I hope you enjoyed this quick tutorial. I would love to hear which side of the fence you fall on when it comes to Friday the 13th!! 
~Happy Creating Jennalee 


Friday, October 6, 2017

The My Rusty Crown Design Team


Hello Everyone!! Last week we met Martina and got to know a little bit about her. This week it is the Design Team's turn to introduce themselves. If you are part of the Facebook group then you may already know us. We are all so proud to be part of Martina's team and so happy to share our tutorials and projects. Thanks for stopping by!! 


Hi!! My name is Jennalee. I am a mixed-media artist. My studio is my happy place and where you can find me whenever I have a few minutes of free time. I have been creative for as long as I can remember. I come from a line of creative women, we have glitter in our veins. I have dabbled in many different areas of the craft world but my true love has always been paper. My current love is incorporating LOTS of Messy Stitching and textiles into my work. My style is ever evolving, but vintage finds always make my heart skip a beat. I live in the Salt Lake Valley in Utah with my husband and puppy, Pepper. My hubby and I love to go junking together. You can follow all my artsy adventures on Instagram and my Blog. ~happy creating~ Jennalee @thepaperedsoiree 


I'm Jess Madaglia. I am a retail manager by day and a crafter by night.  I was born in raised in Massachusetts, but I now call Arizona home.  When I am not working or crafting, I can be found hanging out with my family and our kitties.  I love to teach and can be found at various stores in the Phoenix area.  I am a voracious reader and avid junker.
I have been crafting since I was a kid.  My mum has always been a crafter and I just followed in her footsteps.  I have been rubber stamping and scrapbooking for over 20 years.  I have really been into mixed media for the past several years.
Online I go by TwoMadDahlias, you can find me on my blog, Facebook, and Instagram.
Jess


I'm Milo Lilja, a 45 y.o. cat lady that always have a lot going on. I live in a small city in  Sweden but love traveling around. I'm working with dysfunctional people and help them getting a better life. I love visiting music festivals and concerts, art events, watch movies and just spend time with my lovely man and our cats. 

I've been creating different things as far as I can remember. It make me feel happiness and harmony. The interest for rubber stamps and paper awoke in 1995. In 2006 I started with more advanced scrapbooking. I'm crafting all my free time, and sometimes I'm holding workshops.

I find inspiration in everything and my head is always (too) full of new ideas. I really wish there was more hours/day! 

Hugs Milo Lilja ❤ 


http://Instagram.com/miloliljaart