Friday, March 30, 2018

Easter Bird Nest!

Happy Friday everyone! I hope your weekend and Easter are fabulous! Today I have A Easter themed Bird nest I altered up for you all to see.


I started with this round slab of wood


I used gel medium to adhere my resin, I used the texture Bricks and wood from Stamperia, I then used the gel with a pallet knife and smothered it on giving a wood grain effect.


Here I took Spanish Moss and added matte gel medium to it and formed a nest, I sat it on an upside down vase to dry so it will keep shape.


Plain 'ol plastic easter eggs!
I covered in with Gesso and let dry.


I used the NEW Tim Holtz Collage paper (Floral) and covered the eggs! these papers are to die for!


Now that the wood is dry I covered it in Finnabair pain (Steampunk Copper). Dried that and covered it from head to roe in black gesso. not waiting for the black to dry I took a baby wipe and wiped most of the black off. This gives a great grungy Effect, But since I'm rolling with easter I needed to soften it up! White Gesso to the rescue! I dry brushed it, then dry brushed it again!


I also added a layer of dry brush to the eggs!


Now I took Finnabair art stones and applied those in and around the nest after dry I put clear gesso and added Nuance powder in (coral) 


I also added prills in (Lettace us entertain you!) and (Mango)
 I added Flowers from 49andmarket , and added white and brown splashes everywhere!


Hope you all enjoyed this! 


And Now that I'm looking at it I think it needs a Title! 


 Better! LOL Sometimes for me looking at a picture helps me figure things out!


Product List 


XOXOXO -Nicole
                                           

Thursday, March 22, 2018

Sealife...

Dear creating people! 
Today I’ll show you how I create a sealife card. I use to make cards in 3D but this one is more flat. 


The sea life and text stamps I’ve used are from Stampotique and you can find a lot of cool stamps from them in the shop of My Rusty Crown. I’ve colored the stamps with Distress markers, and they go perfect with water. 
Lace, ribbon and charms comes from my stash, but you can find other at My Rusty Crown as well. 


I have used papers from 13 Arts, Distress Oxides from Tim Holtz, Embossing powder and gemstones from Emerald Creek. 


I cut my papers in different shapes and sizes and added to the card base, 4x6 inch. I used Rangers sticky dabber before I added the embossing powder, so the powder will stay when I heat it. 


I stamped with Distress oxides and added water. I used a brush to catch up the color and splashed it on my card to get more color difference. 


This is how my card looks before I added the stamps. 


And I ended with some art stones and white crackle paint from Prima/Finnabair. 


Monday, March 19, 2018

MRC Inspiration Mood Board

What is a Mood Board?


A mood board is typically a combination of images, fonts, colors, and textures that define the style of the project. It is a tool for creatives and clients to come to an agreement about style. They come in many forms and they might even be called something different depending on the industry that you're in.


We will be posting a mood board with colors each week for inspirational fun for the group! Anyone is welcome to join in. All you have to do is create and post a pic! It can be anything your heart desires, inchy’s, ATC’s, Cards, Canvas, Sewing, ANYTHING! Our Boards will post for you on Tuesdays so keep a look out!  

Friday, March 16, 2018

Altered Hand Mirror

Happy Friday My Awesome Rusty Crown Family!

            So I picked up this Plastic mirror at my local dollar tree, Just plain plastic silver.                                         I started off with taking out the actual mirror


Next I covered the whole thing with clear gesso just to give the slick surface some tooth.


While thats drying I took Some Tim Holtz Alcohol Ink in Mushrrom and gave these resin butterfies a vintage look, The Butterflies are from a Stamperia mould.


Here you can see I added layers of the new Military Rust Effect Paste by Finnabair, I started the the darkest color and did layers, I popped my mirror  back in and started adding on Moss with some gel medium.


Here I'm added more moss and embellishments, I used Finnabair mechanical flowers, 49 and Market Flowers in Lilac . In the Final Picture You'll see I also added Nuvo Crystal drops in English Mustard and some beautiful prills in Go Mango,Lettuce Entertain you, and Spruce willis.


Last step was to dry Brush on Finnabair wax In White Gold


 I hope everyone has a wonderful Weekend! Thanks for stopping by and taking the time to look at my process!
xoxoxo -Nicole


Friday, March 9, 2018

My Rusty Crown

Hello crafters! 
I found a crown in my stash and what fits better to make  than a Rusty Crown. 


I have used stencils from Tim Holtz, same pattern but two different sizes. Stamps from Visable Image, pastes from Prima; Finnabairs. 


I’ve used Allure embossing powder; oil rubbed bronze on the stamped images. 


 After I covered the crown with the pattern from the stencils, I added Distress Oxides from Tim Holtz on my table and sprayed it with some water before I dipped the crown. 


I did the same with other Distress Oxides for the paper with my embossed stamps. 


I cut out my images and I found some vintage pictures from Finnabairs/ Primas collection. I used them as bodies for the moths. 


I draw some strikes on the human bodie parts with a black pen. 


I made the crown Rusty with Prima/Finnabairs Rust paste and patina gold. 


And this is the result! 
Take care! <3 Milo Lilja 

Friday, March 2, 2018

Venetian Angels

                                                                      Venetian Angles
Hello Happy Friday! Today I'm showing you my process of this 12x12 Canvas Using the new Frank Garcia Venetian Shutters !


I started with Tracing the outline of my shutters


 After I new where I wanted them I attached some Moss with matte medium and started attaching my Mat mini brick wall effect. when those were in place I took Finnabair white crackle and slathered the whole canvas.

Here it is with everything in place and the crackle dry.


Next step was using the New Metal Rust Effect Paste by Finnabair to my mini bricks. I started with brown,green then the orange.


Here I'm gonna show you my useless process cause I covered it all up and started over LOL, But some of it still kind of shines through and gives a good grunge look.
I used Stamperia - Mixed Media Aqua Color Spray in Grafite and let it soak into the cracks.


I used some paints to color the background but didnt like the shine with the brick


Up Close look


Here I attach the Prima Marketing Frank Garcia Venetian Shutters On top of Stamperia rice paper. 


 The Rice paper I used TIm Holtz Crazing Medium to give an aged crackle.


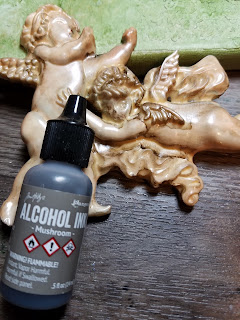
Here I aged my Stamperia angels with Tim Holtz Alcohol ink, "Mushroom"


okay So I just used some green Spray and sprayed the backround green, I added Flowers from 49 and Market, Floral Mixology Emerald Isle and Cosmopolitan,I used White sand paste,and Mini Prills in Spruce Willis and Coral See. I used White Gesso to Dry brush the brick and flowers and Bam! done!


Thanks For Looking!