Friday, August 31, 2018

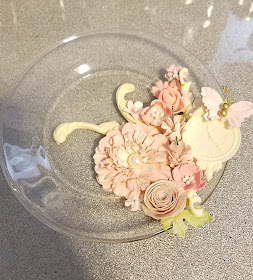
Shabby Chic? Altered Dessert plate!

Hiya! Happy Friday! Today I am gonna show you how I decorated this dessert plate!


Well your gonna need a plate LOL I didnt prep it at all but, you totally could add texture with a stencil or crackle pastes!


So I got out all my embellishments,my main ones at least, I coated my Prima resin pieces with clear gesso and went about gluing them down with heavy Body gel.


I used Cosmic Shimmer Shimmer Shakers in colors (Delicate Blossom) (Rich Wine) (Grass Green) and (Bright Sunshine). These little jars have a shaker top, so easy to sprinkle on.. After I Sprinkled my colors I lightly sprayed them with water and dried with a heat gun, I did each color separately.


Here Is what It looked like right after drying, I purposely shook some on the other side of the plate for a cute splatter effect. I Took a dry brush and dry brushed  on some white gesso to bring all of the texture to the surface. I then added (Blush Haze) Holographic Glitterbitz  and Prills in ( Coral See). for the last added touch I took (White Gold) Prima Finnabair Metallique wax half way around the edge of the plate.


Done! 


As Always My list Of Items used Linked just give them a little click!


XOXO - Nicole Palos


Friday, August 24, 2018

Present card


A friend asked me if I could make a present card to her man, and he is a body builder. She wanted the theme on the card to go in gym style, so I made this barbell. 


I love to make my own templates, so I used cardboard, and draw my barbell. 


I wanted it to look a bit 3D, so I cut out some of the parts for 2 and 3 layers. 


I used PentArts Iron Paste to color my pieces. 


I added all pieces together. 


I have Tim Holtz SideKick, and in the starter kit this tag and numbers are included. Oh my god! That little machine is so so so perfect to use for all small dies. I love it! It takes no space and it’s perfect to carry for events. 


I used some letters and a present card stamp from my stash.  


The flowers plus butterfly are from Prima Marketing. 

Take care! / http://instagram.com/MiloLiljaArt 
http://instagram.com/MiloLiljaArt 

Friday, August 17, 2018

Rusty Pipes

   HI!  Happy Friday! Today I wanted to Show you all the Pentart Expand Paste and how I used it to rusty up these pipes.  if you dont have Finnabair rust pastes here is another option for you!                                      


I started off with gluing down my chipboard with gel meduim


in this picture you see where I took a palette knife and spread on the paste with a thin layer, I mean very this you dont need very much.


Now you heat set it with a heating tool, its bubbles all up and turns white in just seconds! Now look at all that texture it has left me with! perfect for rusty pipes! I also added some stenciling with the Little birdie (Brick wall) 


after the panel was completely dry I started adding my colors this is such a beautiful shade of blue. Electric Blue Cosmic Shimmer Shakers, I sprinkled it on and spritzed it with water. 


after that is  good and dry I dry brushed some black gesso went along some of the edges for a drop shadow and to add some depth.


Now I sprayed the pipes with Little Birdie color splash in (Paprika) PERFECT rusty color spray!


I heat set it again with my heat tool. Loving the spilled spray around the pipes give a great rust look!


 I just adding my finishing touches some Tim Holtz quotes, some finnabair was in (Copper) and inked archival around the edges. Oh and Prills in (Third Place).
XOXO-Nicole


Friday, August 10, 2018

Mixed media palette


Hello crafters! 
Today I’ve made a video for u to see how I did this palette. 
Click the link down to see the full video. 
Hugs Milo <3 


Friday, August 3, 2018

My Rusty Crown!

Today I'm showing you how I created this rusty crown, I wanted to make something for our beloved Martina! I wanted something to say thank you! she has made a place for us to shop and make friends! My rusty crown inspiration FB group is such a great place, we can share our day to day activities our art of the day or something we made years ago. The people in this group are amazing and that is a reflection of martina! anyway enough of the feels. LOL hope you all like it!


Starting off with some cardboard,Using  heavy gel medium and some clips I started to make my basic shape ,and the clips kept it together for me


So now I have the basic base, leaving it to dry for a couple hours.


So this is how it was assembled, I took  10 min resin and some silicone moulds ,taking the resin out before it was fully cured still gives it some time before it hardens all the way up. then I took anything heavy to hold it there for a couple more mins till it hardened all the way. now sinse then I have figured out you can heat already cured resin with a heat gun and it becomes soft and pliable again.


So I added all my resin and goodies gave it a coat of black gesso and started using my rust paste. for this I used a sponge dapper .


Using all three colors from Finnabairs Rust Effect Pastes.


finishing touches I used the mint colored rust paste for a little dry brushing, then I added the Prima Finnabair  rose gold wax to give that pink undertone to represent  Martina and her shop! I made a bee out of metal and plush wings and added a charm. (The Queen Bee). Hope you all like it.


XOXO -Nicole